From NeoRouterWiki
(Difference between revisions)
|
|
| Line 8: |
Line 8: |
| | [[Image:NetworkExplorerSignIn.JPG]] | | [[Image:NetworkExplorerSignIn.JPG]] |
| | | | |
| - | 2. Enter user name and password of a valid account. You can use the administrator account created during server setup. Or you can create additional accounts in the Configuration Explorer. | + | 2. Enter user name and password of a valid account. You can use the administrator account created during server setup ([[NeoRouterWiki:ServerSetup]]). Or you can create additional accounts in the Configuration Explorer. |
| | | | |
| - | 3. In the "Log on to" field, enter the domain name you have chosen during server setup. If you did not setup a domain name, you can enter the server’s IP address or computer name. You can also enter "localhost" if the Network Explorer is on the same PC as the server. | + | 3. In the "Log on to" field, enter the domain name you have chosen during server setup ([[NeoRouterWiki:ServerSetup]]). If you did not setup a domain name, you can enter the server’s IP address or computer name. You can also enter "localhost" if the Network Explorer is on the same PC as the server. |
| | | | |
| | 4. Click the "Sign In" button. | | 4. Click the "Sign In" button. |
| - |
| |
| | | | |
| | === Manage computer list === | | === Manage computer list === |
Revision as of 14:50, 15 November 2008
NeoRouter Network Explorer
Sign In
1. Launch NeoRouter Network Explorer from "Windows Start Menu | All Programs | NeoRouter | NeoRouter Network Explorer".
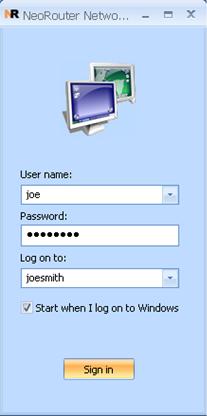
2. Enter user name and password of a valid account. You can use the administrator account created during server setup (NeoRouterWiki:ServerSetup). Or you can create additional accounts in the Configuration Explorer.
3. In the "Log on to" field, enter the domain name you have chosen during server setup (NeoRouterWiki:ServerSetup). If you did not setup a domain name, you can enter the server’s IP address or computer name. You can also enter "localhost" if the Network Explorer is on the same PC as the server.
4. Click the "Sign In" button.
Manage computer list
The computer list is your view of the virtual LAN. You can add any computer of your LAN to this list and organize according to your preference. You will always have the same list regardless where you sign in from. Each user will have his/her separate list.
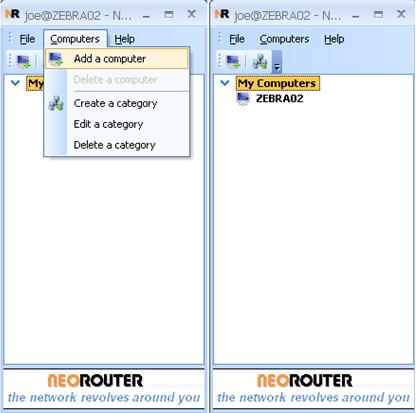
Initially you will an empty computer list after signing in for the very first time (like the left picture below). To add a computer, you can choose the menu "Computers | Add a computer", and then select the computer and category in the dialog. Once complete, your computer list will be updated (see the right picture below).
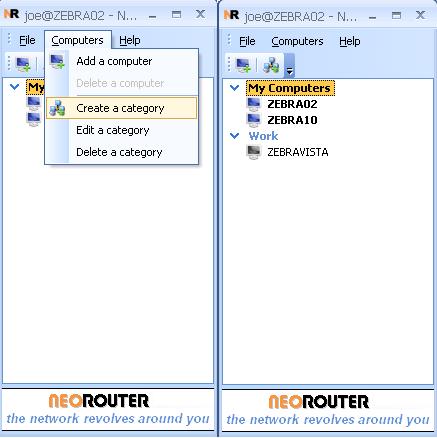
You can use categories to help manage a long list of computers. To create a category, you can choose menu "Computers | Create a category". To move a computer to a different category, you can simply drag and drop.
Remote access
In the computer list, two different icons  and
and  are used to represent online and offline computers respectively.
If you click on a computer in the list, a popup dialog will display a list of actions you can take to remotely control and access this computer. If a computer is online, the following actions are supported:
| Icon
| Action
|

| remote desktop connection
|

| file sharing
|

| ICMP ping
|

| copy the IP address
|
If a computer is offline, the following actions are supported:
| Icon
| Action
|

| remote wakeup
|
Coming soon: we will allow user to define custom actions, so you can add your favorite tools to this action list.

Information on Microsoft Remote Desktop Connection
For XP users: Get started using Remote Desktop with Windows XP Professional
For Vista users: Remote Desktop Connection: frequently asked questions
Information on Windows File Sharing
For XP users: Sharing files
For Vista users: File sharing essentials
Information on Wake-on-LAN
WikiPedia: Wake-on-LAN
EnergyStar: Wake On Local Area Network (LAN)


